Tuesday, February 16, 2016

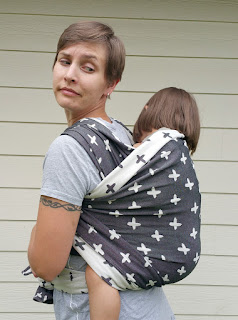
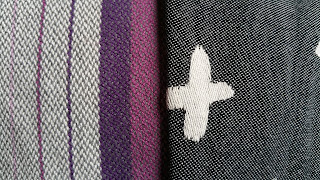
Wrap Scrap Shirt from Oscha Chiisai Knots Gentian

As months fly by, the day is quickly approaching that we won't need our stash of baby wraps anymore. I have some older ones, that haven't sold, and some that I intend to keep for memories and the problem arises what to do with them beyond wrap form. So far, I've got one thats been cut in three and sewn together for a blanket, I've got a wallet, some stuffed animals for the kids, cushion covers for the couch, scarves, shawls and cowls and a bag in the works. I also have had a dream to make some clothing for me and maybe a quilt for one of the kids.

I've played around with ideas on clothing for a while, saved some photos from online, kept an eye out on patterns. Nothing exactly that I wanted came along that was ready to use, so while my parents were visiting and I had some extra help watching the kids, I decided to just make my own. Here's a quick story on how this shirt came to be.

I started several months ago with saving photos from random places on my desktop to use as inspiration on what I wanted to make, and what I might possibly find a pattern for. For patterns I actively tried searching for cool hoodie patterns high and low, but didn't really come across anything.

From all the searches, this was the one, at the end that I liked, that I thought that I might be able to figure out how to do.


The wrap material is non-stretchy, so I figured for the garment to be even remotely fitting it would have to either have a zipper, or need some sort of stretchy fabric in places. I've never put in a zipper for a hoodie, so decided to go with stretchy panels for the sides and underarms. At first I tried making a muslin pattern on my dress form, but after about 10 min figured, I have no idea how to make a sleeve like that, so decided I need to use an existing pattern an modify it. 

If you've never heard of Ottobre and like sewing, its an awesome magazine. The normal monthly editions are for kids clothing, but twice a year they have a womens issue which I love. I've bought several loose numbers and after thinking of my options settled on this sporty coat from the Womens winter 5/2014 issue.  Click on the picture and you can see the magazine cover and all the patterns in it. 


Why I chose this one? This one already had the seam on the side of the coat that I wanted to use in my shirt and the sleeves were the style I wanted.
How did I change the pattern?
1- I omitted the zipper, just put the front pattern piece on a fold on my fabric
2- I took away 2" on both sides of the sleeve and made a middle panel from the
3 - cut away 2 inches from the back pattern piece and added it to the side panel, to make the side panel wrap around more.
4- make the collar piece super wide (didn't want as bulky of a collar as in the inspiration picture either),
5- take off couple inches from the sleeve and make a 5" long piece of stretchy fabric (I don't know what its called in english, sorry) to be the sleeve cuff
6- add one more stretchy fabric piece for the bottom so that I could wear it with tights and cover my bum bum.
7- add a pocket in the front.

I measured myself and cut at about the biggest size for me. (Im a sporty fit, with shoulders, waist and hips being close together, so I got a sz 42 for me at the biggest size.) After cutting the pattern out, I cut out pieces from scrap fabrics that I didn't mid using, some jersey and a woolen fabric, similar in weight and stretch as my final fabrics and made a mock up. It fit pretty well on the top, but was huge on the bottom, so i knew i needed to make my pattern a little slimmer across the bottom. I was pretty happy with it otherwise, so decided to get the wrap fabric out and make a "real" shirt. The wrap is Oscha Chiisai Knots Gentian. I think the small pattern works really well in a shirt.

With the little changes I cut out pieces and put the second shirt together. The stretchy fabric is from Joann. I believe its called sweater fleece, and looks like knit fabric on the top and a brushed fluffy texture on the underside. As far a how much wrap I used, the pattern pieces just barely fit upright on the wrap, so I actually didn't use up that much fabric. I started with a long sz 4 and ended up with a generous ring sling piece after all the pieces were cut. The only unforeseen hitch came with the bottom. The fit of this is obviously a little different than the inspiration picture, I'm not that curvy, and with a non stretchy material it needed to be a little looser anyways. So when I added the stretchy fabric on the bottom ( I wanted to save on materials and didn't put it on my trial one) it kind looked like a mushroom top the way it bulged out. To fix it, I ended up sewing the hem up an inch, so now there is a lip of fabric where the wrap ends at the bottom, then is sewn up about an inch, so the stretchy fabric than comes down like a second layer little mini skirt. I like the look and it is loose enough to stay down when I move about, and covers my butt, which was the function I wanted it to have. So heres what it looks like finished:


Now this was actually still a trial one, I didn't have the balls to cut up my expensive wrap yet, I wanted to do this with Oscha Orion Lumina sz3 that I have. I've been wearing it out and about today, and its super comfy, with picking up kids and working around the house. so when I get another chance to sew again, I'll try to make the real one. I always love feedback and if you decide to make something similar its always fun to share pictures and stories. 


Sunday, August 30, 2015

Kokoro Mini Ren Nero Review and Comparison to Woven Wings, Oscha, Girasol


Our first ever Kokoro arrived this week!
Mini Ren Nero. I have been trying to score a Kokoro for ages, and never am quite fast enough. This week was pretty exciting, as the first ever Kokoro wrap arrived on our doorstep! I had to write a first full review, since the material is so different from anything else that we've ever tried (which is a bunch!).

So to start off, let me summarize what Kokoro claims about the wrap:
-This is first in their line of "cool weave" wraps.
-The way that it is woven will keep you cool in the summer heat.
-The ice cotton is spun in a way that lets more air pass through, making it cooler to the touch when worn.
-It is supposed to have a naturally silken sheen, be less dense and lay flat in hand similar to hemp.
-The materials listed on the label are 50% Ice Cotton and 50% organic cotton.
-The other side of the label says "ice weave".

Living in TX heat, with record breaking heat this summer, I was on the edge of my seat to give this bad boy a go. We've now had it several days, given it a bath, and worn both the kids (2 yr 29lbs and 4 yr 33lbs) in it. All I can say is that I'm impressed and why was this wrap not available to me 4 years ago! I don't easily get into the hype of things anymore, but this wrap is unlike anything we've owned. Let me do my best to get into detail to describe it and compare it to others.


In hand: in hand this wrap feels flat, sleek and smooth. It feels heavier than it looks, and after a wash the white side fluffed up, but the black side, which I assume is the ice cotton side looks pretty much the same pre and post wash/wear. The white side is soft and smooth and to me it feels like it has more grip than the black side. The black side feels slick and slippery, almost like polyester or plastic. I feel more confident wrapping with the white side in, because it seems it would grip better and there would be less potential seat popping with a temper tantrum throwing 2 year old. The black side feels cooler on the skin, so its nice to have it facing in, but I like the look of having the black facing out, so thats a conundrum. lol


As I said the weave feels flat, there is no give or fluff to it if you squeeze it between your fingers or knot it. It feels heavy and dense for the airiness that it has when you hold it up to the light. I suspect that the fibers are wound tighter, making for a heavier denser yarn that does not fluff up when washed. As this wrap is only in the first week of use, I'll have to update later with how its breaking in/black side fluffing or not. Even though I feel this wrap needs no breaking in, straight out of the wash, it is soft and supple.


Wrapping qualities:
This wrap feels so thin in hand, I was skeptical how comfortable it was going to be with the 30lbs kiddos. My shoulders are very picky and over the years my wrap stash has evolved to suit them. I don't know how its possible, but wrapping with Nero is so easy because its so thin, but it manages to be very supportive, and felt cushy on my shoulders. The wrap is fairly slippery, so it was super easy to tighten up around us. On the same note, if I wasn't careful to hold onto the passes, I could see that what I just tightened slipping back loose around us. Once we had it on, I felt like it was secure and would not budge.

The closest I thought how to describe it would be how you imagine it would feel like wrapping with a sheet of koolnit (like in kinder pack). It really does feel airy and light and cool to the touch, and out of my stash, this is my hands down top pick for hot and humid weather. On the flip side, I don't know how I would feel like using this in a cold climate in the winter. I think it would not offer very much insulation, and would make baby cold easily, but if you and the baby are furnaces, maybe this is the solution for you.

The wrap is obviously toddler proof, and because it is so supple and soft, I'd say it is perfect for squish too. I'd wear white in on squish and black in for toddler.  


Comparing it to other wraps:

Girasol Rainbow Unicorn thick twill, 100% Cotton
Oscha Koi Zen, 20% linen, 30% cotton, 50% hemp, 269gsm
Oscha Okinami Sia, 25% Silk, 75% cotton
Kokoro Mini Ren Nero, 50% ice cotton, 50% organic cotton, 292gsm
Woven Wings Greenfinch, 79% cotton, 21% linen, 272gsm
Oscha Orion Lumina, 100% cotton
Woven Wings Over the Rainbow, 9% merino, 91% cotton, 330gsm

I was trying to figure out how to compare the wrap to others that I already have. There are two videos featuring the above wraps where I talk through some of the differences. The knotting shows the thicknesses in a different way and you can also see how they drape over the top of the chair. the thick ones are on the outside and the thin ones towards the middle. Compared to the other ones, the Ren Nero was the easiest to knot. and seemed to have the densest knot with least amount of tugging. 


Knots from the top.


Comparing the texture flat with WW greenfinch and Oscha Oki Sia. The greenfinch is thick and fluffy in hand, and the sia and ren are flatter. With Sia I have to be more careful with my passes to keep it comfortable. You can also see the size of the weave when put together. 


The texture from the white softer side. 


Comparing it to the thicker twill Girasol. The Girasol is still fairly new, so it is also stiffer, but it is quite a lot thicker and bulkier and almost feels like cardboard next to the Ren. 


Here is the video, where I do a quick comparison the other wraps. The second video shows how the wraps behave when they are being twisted.


What a great fake smile we get when candy bribes are brought to the game... If there is something I didn't mention, please ask. **I was not paid or compensated in any for for writing this and the opinions expressed are completely my own. I wanted to try to describe the wrap the best I could, because it is something so new and didn't' know what to expect before I opened it. 


Wednesday, January 28, 2015

Kasumi Nassau Makeover to Dye for (and short review)

Lets talk about dyeing wraps again! I just finished dyeing Oscha Kasumi Nassau this week and am super excited about it. Kasumi Nassau was a wrap specifically made for the 2014 Dutch baby wearing conference. They had some leftovers for sale and I was able to snag one, not because I liked the colors, but because of the possibilities it offered. 

The wrap already came with a red, white and blue gradation, that was achieved in alternating the three colors of warp yarn. While the wrap is great for a 4th of July celebration, I thought it needed some sprucing up to be used in our regular rotation. I envisioned in my head and playing with photoshop a beautiful wrap with a gradation from blues to green, yellow and orange. I think of it as a boy sunset or rainbow. 


Above is the wrap in its original state. The red was pretty similar to the Kasumi peitho that I stripped, so I assumed it would behave the same and it did. I pre washed my wrap and accordion folded it on some clip hangers generously donated from Target. (If you ask at the register, they will give you hangers from the bin underneath. At least they did at our target...)

I had a pot of hot water on the stove, NOT one you use for cooking, but my big dyeing pot. A pouch of RIT color remover stirred in and I was ready to go. I did not want to strip all the color off, just the red end, so I dipped it in the pot and almost instantly the color was coming off. I got a little scared, and only swooshed it around about 5 min before removing and washing out. I did not want to lose all the contrast of the design in stripping. Below is the result. The color was now a deep yellow/light orange. 


Couple of nights later I had time to work on it again. I decided to start with the blue side first, and changed the hangers to the other end. Then after some brainstorming while the blue end of the wrap was soaking in a soda ash solution, I rigged up this very *fancy* grad dyeing station in our cramped bathroom. I have a tall garbage bin to hold the dye solution and the wrap is hanging off a drying rack that I have. 


I used Slinging Joeys tutorial as a base for this grad dye. I figured I needed a way to add more water to the bin without splashing dye all over the place so I came up with a classy tube/ductape/funnel system that fed to the bottom of the bin from the top of my drying rack. I was not quite as scientific with adding water as what is described on Slinging Joey, but I had a general idea of how many gallons I needed to add to the bin in an hour to make it up to where I wanted the water to come. The colors I used for the dye were 1/4 Jade Green and 3/4 Grecian Sea from Dharmas Procion fiber reactive dyes. I used a little more than Dharma's directions call for, to make sure I was getting a good blue with all the diluting. 

I started the wrap in the dye about 1/3 up from the bottom, since I wanted a solid blue on the first part. In the first 5 min, I got impatient and actually dipped the whole thing in as far as I wanted the blue to come to give me some guideline how far I needed to come up. I had a bowl that took 1/2 gallon that I would mix up batches of salt and soda ash. I figured if I pour in about one 1/2 gallon bucket over the course of 5min, it will rise at the rate I want it to. I had a cup measure that I ladled the water with, and a stick that I would help swoosh the fabric and dye solution around every now and then.  


Sooo, as you can imagine it was a pretty long hour. Good thing I had the foresight to bring the tablet in to catch up on tv-shows while standing there. :) After dyeing, I managed to move the wrap to the bathtub without getting dye anywhere. I would have dyed in the tub, had my rack fit in there... And then I rinsed, rinsed, rinsed and rinsed. I did this by letting out a couple inches of cold water on the bottom of the tub and then holding the yellow end up, rinsed and soaked the blue end in the tub. Then I tossed it in a hot wash. 


Here is what it looked like after washing and line drying. the yellow got a little stained by the blue, but it wasn't too bad. I figured during the dyeing process and extra washing some of it would come out (and it did).


I got to the yellow and orange a couple days later and decided to do them a little different because the area to dye was not that tall. I put the wrap on some hangers and stuck it in the soda ash soak. While soaking the yellow end in the soda ash, I started with the yellow dye, Dylon yellow, and mixed two packets up with the required salt and soda ash in a small 8" tall plastic bin. This time I had the bin in the bathtub and had a rope to hang the wrap from over the rail. With the solution ready, I set my timer up for 60 min and dipped my wrap in the dye. I did more of a moving up and down thing this time around. I wanted most of the yellow dye pretty dark and even to make it show more with the orange and blue. I over dyed with the blue a little and then kept moving it up and down every 5 min or so to avoid getting lines. After 60 min the yellow looked pretty good and I moved it over to drip while we had dinner. 

After dinner, I took the same bin and mixed a bath of Dharma's Deep Orange in it, again a little more concentrated than I normally would. The technique was the same with this one as with the yellow. I had the rope over the rail and would use that to help support the wrap as I moved it up and down in the bath. I started out again dipping it as high as I wanted the dye to go and then moved the wrap up and down in the dye bath for the grad effect as I felt fit. It turned out how I envisioned it, and at the end of 60 min was happy to rinse off both the yellow and orange before tossing the wrap in another wash. I added a little bit of blue dawn in the wash to help the extra dye come out.   

Here's pics of the finished wrap. I absolutely love it! the colors are so vibrant, and I love the delicate yellow and green in the middle of the bright blues and orange. 


A short review: I am working on breaking in this wrap now and it is becoming softer as I go along. The wrap is a 50/50 linen cotton blend and fairly thin, so it should work really well in the summer months. It is a pretty tight weave and has some grip to it but not enough to make it hard to pull passes tight. It wraps solidly with my two kids (18 mo & 3.5 yrs) and seems not diggy on my shoulders. I don't know if that's because I am finally better at wrapping, or because the wrap is just that awesome. lol. It's definitely one of our new favorites and a perfect summer wrap with its bright summery colors.

If I got to change one thing about this wrap, it would be to add silk to it, like in Kasumi Peitho, so that the pattern would have turned out more visible. But it definitely shows better than just having dyed a solid color wrap.

Here's a couple more shots, as I was working to break it in tonight on the couch (don't mind the dingy lighting).


Dyeing Oscha Kasumi Peitho w/ Short Review

I am always falling in love with new wraps, but sometimes it's fun to dabble in some dye and make something new from what we have. I wanted to share the dye process of two Oscha Kasumi patterned wraps and a short review of both. I've got a lot of photos, so maybe it be best I make two separate postings of them. Lets start with the one I did first: Kasumi Peitho. 
I had this colourway both as a wrap and ring sling and below you can see what the original color looked like. I loved the red and white, but always felt like the water theme deserved something more blue and green. 


Before jumping in I did a little research and found out from some one who had already done it that when stripped the red color would turn a caramel yellow and the white into a light yellow. I wanted to make sure that after dyeing the original pattern was still noticeable. The advantage to dyeing this wrap was that 25% of the makeup was silk, which needs a different dye process to dye than cotton, which meant that when dyeing with Dharma's Procion fiber reactive dyes, they would only take to the cotton fibers and leave the silk fibers just a little stained. 
I played on photoshop a while to figure out what color combo would look the nicest, and finally ordered some turquoise and jade green dye. I did a normal tub dye with the recommended dye amounts per pound. The ratio of colors was about 2/3 turquoise and 1/3 jade green.  Before dyeing I did a quick soak in soda ash.


Wrap in the dye bath


Rinsed out and washed. The red turned more into a dark red and the blue was really pretty. 


I almost wanted to leave it at that, but my original idea was a green and blue, so after a month of looking at it, I decided to go ahead and strip it. For the stripping, I poured hot water in a cooler and used RIT color remover from our local grocery store. Here's my supplies before starting: stirring stick, cooler, rubber gloves, scissors, timer, hot water.


You can see the water color is changing. During the process I couldn't really tell how far it was going, so I just did the recommended time. The dye is coming off, but I couldn't really tell until I was rinsing what the final color was. A lot of the color came out while rinsing in the bathtub.  


After a final wash the wrap was finished. Here it's pictured next to Kasumi Nahua, which was my original dream wrap and inspiration for this one. At the end of the day, I ended up liking my creation better. The red is now a pretty olive green color and the blue is a nice blue green sea foam. But what can I say, they are both pretty.


And of course some action shots:


Quick review: This is one of the thicker Oscha wraps that I have owned. It was a little grippy from the very beginning, and it has a silk smell to it that was different than my cotton/linen/hemp blends. It's up to you if you like that or not. The smell got weaker as the wrap was used and washed. I would have thought that silk was more slippery, but both my silk blend wraps (SN Nebula and this) from Oscha have similar wrapping qualities. Once you got the passes in place it would hold very well and was super supportive. I wouldn't say that this is the cushiest marshmallow wrap on my shoulders, but it's not diggy or uncomfortable either. Because of it's thickness it is a great wrap for the appropriate weather. We live in TX now, and I would not choose this as something to use when it's 90-110 degrees outside. In the winter, I love having this around.  

Next post, I'll go over the dye process for a sister wrap for this, the Kasumi Nassau.

Finnfactor Design

Finnfactor Design