
Lets talk about dyeing wraps again! I just finished dyeing Oscha Kasumi Nassau this week and am super excited about it. Kasumi Nassau was a wrap specifically made for the 2014 Dutch baby wearing conference. They had some leftovers for sale and I was able to snag one, not because I liked the colors, but because of the possibilities it offered.
The wrap already came with a red, white and blue gradation, that was achieved in alternating the three colors of warp yarn. While the wrap is great for a 4th of July celebration, I thought it needed some sprucing up to be used in our regular rotation. I envisioned in my head and playing with photoshop a beautiful wrap with a gradation from blues to green, yellow and orange. I think of it as a boy sunset or rainbow.
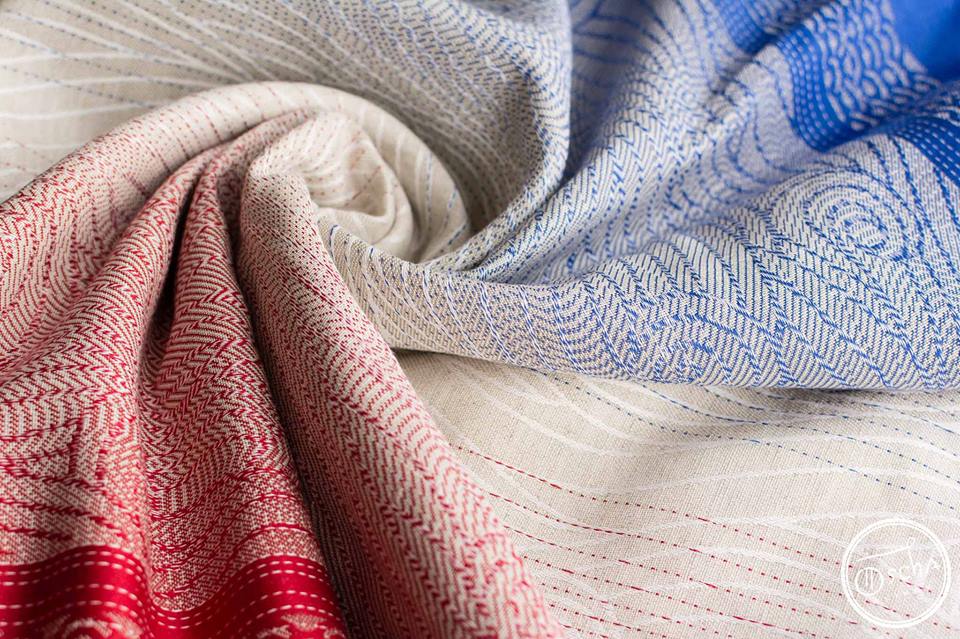
Above is the wrap in its original state. The red was pretty similar to the Kasumi peitho that I stripped, so I assumed it would behave the same and it did. I pre washed my wrap and accordion folded it on some clip hangers generously donated from Target. (If you ask at the register, they will give you hangers from the bin underneath. At least they did at our target...)
I had a pot of hot water on the stove, NOT one you use for cooking, but my big dyeing pot. A pouch of RIT color remover stirred in and I was ready to go. I did not want to strip all the color off, just the red end, so I dipped it in the pot and almost instantly the color was coming off. I got a little scared, and only swooshed it around about 5 min before removing and washing out. I did not want to lose all the contrast of the design in stripping. Below is the result. The color was now a deep yellow/light orange.


Couple of nights later I had time to work on it again. I decided to start with the blue side first, and changed the hangers to the other end. Then after some brainstorming while the blue end of the wrap was soaking in a soda ash solution, I rigged up this very *fancy* grad dyeing station in our cramped bathroom. I have a tall garbage bin to hold the dye solution and the wrap is hanging off a drying rack that I have.

I used Slinging Joeys tutorial as a base for this grad dye. I figured I needed a way to add more water to the bin without splashing dye all over the place so I came up with a classy tube/ductape/funnel system that fed to the bottom of the bin from the top of my drying rack. I was not quite as scientific with adding water as what is described on Slinging Joey, but I had a general idea of how many gallons I needed to add to the bin in an hour to make it up to where I wanted the water to come. The colors I used for the dye were 1/4 Jade Green and 3/4 Grecian Sea from Dharmas Procion fiber reactive dyes. I used a little more than Dharma's directions call for, to make sure I was getting a good blue with all the diluting.
I started the wrap in the dye about 1/3 up from the bottom, since I wanted a solid blue on the first part. In the first 5 min, I got impatient and actually dipped the whole thing in as far as I wanted the blue to come to give me some guideline how far I needed to come up. I had a bowl that took 1/2 gallon that I would mix up batches of salt and soda ash. I figured if I pour in about one 1/2 gallon bucket over the course of 5min, it will rise at the rate I want it to. I had a cup measure that I ladled the water with, and a stick that I would help swoosh the fabric and dye solution around every now and then.

Sooo, as you can imagine it was a pretty long hour. Good thing I had the foresight to bring the tablet in to catch up on tv-shows while standing there. :) After dyeing, I managed to move the wrap to the bathtub without getting dye anywhere. I would have dyed in the tub, had my rack fit in there... And then I rinsed, rinsed, rinsed and rinsed. I did this by letting out a couple inches of cold water on the bottom of the tub and then holding the yellow end up, rinsed and soaked the blue end in the tub. Then I tossed it in a hot wash.

Here is what it looked like after washing and line drying. the yellow got a little stained by the blue, but it wasn't too bad. I figured during the dyeing process and extra washing some of it would come out (and it did).

I got to the yellow and orange a couple days later and decided to do them a little different because the area to dye was not that tall. I put the wrap on some hangers and stuck it in the soda ash soak. While soaking the yellow end in the soda ash, I started with the yellow dye, Dylon yellow, and mixed two packets up with the required salt and soda ash in a small 8" tall plastic bin. This time I had the bin in the bathtub and had a rope to hang the wrap from over the rail. With the solution ready, I set my timer up for 60 min and dipped my wrap in the dye. I did more of a moving up and down thing this time around. I wanted most of the yellow dye pretty dark and even to make it show more with the orange and blue. I over dyed with the blue a little and then kept moving it up and down every 5 min or so to avoid getting lines. After 60 min the yellow looked pretty good and I moved it over to drip while we had dinner.
After dinner, I took the same bin and mixed a bath of Dharma's Deep Orange in it, again a little more concentrated than I normally would. The technique was the same with this one as with the yellow. I had the rope over the rail and would use that to help support the wrap as I moved it up and down in the bath. I started out again dipping it as high as I wanted the dye to go and then moved the wrap up and down in the dye bath for the grad effect as I felt fit. It turned out how I envisioned it, and at the end of 60 min was happy to rinse off both the yellow and orange before tossing the wrap in another wash. I added a little bit of blue dawn in the wash to help the extra dye come out.
Here's pics of the finished wrap. I absolutely love it! the colors are so vibrant, and I love the delicate yellow and green in the middle of the bright blues and orange.


A short review: I am working on breaking in this wrap now and it is becoming softer as I go along. The wrap is a 50/50 linen cotton blend and fairly thin, so it should work really well in the summer months. It is a pretty tight weave and has some grip to it but not enough to make it hard to pull passes tight. It wraps solidly with my two kids (18 mo & 3.5 yrs) and seems not diggy on my shoulders. I don't know if that's because I am finally better at wrapping, or because the wrap is just that awesome. lol. It's definitely one of our new favorites and a perfect summer wrap with its bright summery colors.
If I got to change one thing about this wrap, it would be to add silk to it, like in Kasumi Peitho, so that the pattern would have turned out more visible. But it definitely shows better than just having dyed a solid color wrap.
Here's a couple more shots, as I was working to break it in tonight on the couch (don't mind the dingy lighting).


1 comment:
Post a Comment