Showing posts with label sewing. Show all posts

Friday, June 5, 2009

Dress, skirt and Cake


What could be better than that!
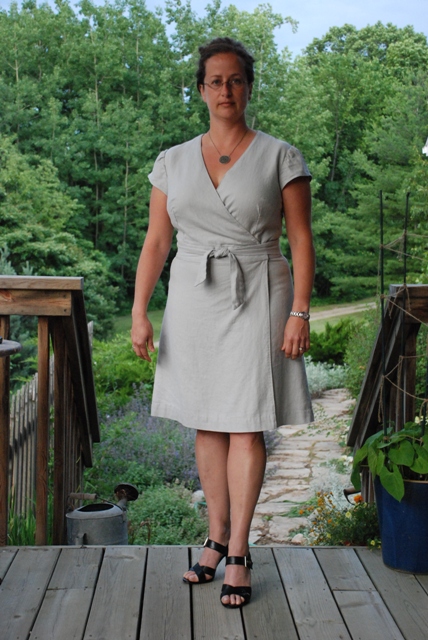
I made the New Look 6674 wrap around dress a couple of weeks ago. This was going to be my practice dress, with some pretty flower fabric that I had bought from the thrift store (used to be sheets). It was a pretty easy pattern to sew, but of course I wantd to make things complicated for myself by making it into a reversible dress.
The idea with the reversibility worked out pretty well, except for one spot where the fabric is pulling from my armpit to the neck. I also wish that the dress would cover up more in the celavage area, now I have to wear a top underneath it if I would ever dare to wear this in public. I think for my next try I will also make it out of a stretchy fabric, and add the contrasting color band to the neckline. I will also have to figure out what to do with that part around my neck thats pulling. If anyone has any ideas on where to add or change the pattern, ideas are welcome.
I am posting two views of the dress, one turned each way. Here are also a couple of other pictures of successful NL 6674 dresses.
While I was sewing, I whipped up a little summer skirt with pockets. It was an old pillowcase, and the fabric was just so cute I had to do something with it. (its still a little wrinkly here) I just kept fitting it on and sewing as I went along. Not the professional way of making things, but it wasn't a serious project, so I just winged it. The top part is a stretchy fabric to make it comfortable to wear to the beach or a walk with the dogs.

I seem to have also been made the designated cake baker for my husbands unit. I made a chocolate cake yesterday for a birthday, but forgot to take a picture before my husband took it to work. This caramel and almond topped cake was for another b-day about a month ago. It was super tasty with fruity filling and whipped cream on the inside.

Monday, April 13, 2009

March winner!

Congratulations! The give-away winner for the kitty earrings for March was Aminyitray! See the older post for details.

I was able to post a new hedgehog on Etsy and have some owls ready to go. Now I just need the time to get them posted...

Tuesday, March 31, 2009

New Patterns

I visited a friend a couple of weeks ago and she borrowed a whole bunch of cute Japanese craft books to me. I loved flipping through everything and drooling over all the cute little critters.

I drew some of the patterns out, and in my enthusiasm was able to put them into practice. I started out with two owls and a hedge hog. I had seen the owls in so many places before, and it was nice to make some myself. I got so excited that I cut a whole bunch of fabric out and started 12 more. I had to go to a conference so I could not finish them all right away, but here is where I got so far.
Harry the hedgehog was fun to make. He is very small though, so it took a lot of effort to sew and turn the arms inside out. On such a small scale the corduroy was pretty stiff to maneuver. When finished he ended up turning out just as cute as the hedgehogs. I cut another hedgehog out, but haven’t had time to sew it together yet. It is fun to work on this miniature scale for a change. IT takes just as long to make as bigger stuffed animals, but smaller is always cuter.

The watercolor class I talked about earlier is also a lot of fun. I am learning some new tips, but mostly I enjoy just getting back into making drawings again. After the first week, the assignment was to work on basic watercolor techniques. I am not a very good student, since you can tell I never finished my exercises… I guess I should work on this again.
The next week we were working on shading, and had to bring in a round object. I had chosen a garlic, but had to use 5 cloves of it the night before for cooking, so it ended up being a half a garlic. We were just painting with a gray color to practice lights and darks.
Last week we had to bring an artichoke in and draw that with graphite. Tomorrow we are going to bring the completed drawings in and paint over them with watercolors. I am excited to do that, since I have done a lot of drawing and my prints are predominantly black and white, but don’t really know the intricacies of color in plant life. Listening to the teacher there seems to be a lot of things I never noticed. Apparently on a green leaf the highlights always have yellow undertones and highlights have blues. I would have thought opposite. So after my great attempt at painting this artichoke tomorrow I’ll post it here.

On a completely different note, if you have seen those pretty letter pressed cards in gift shops and wonder how they are made, I will soon post a video from a printmaking conference I just came home from.

Saturday, January 17, 2009

Owlets

I finished a set of five owlies for the Shiny Squirrel Boutique (see link on sidebar)yesterday. It was a fun pattern to come up with, and a fairly easy one to sew.
I used some brown courdroy and a wool tweed for the front. The little creases on the bottom give the impression of a little tail in the back. Here are some of the little ones ready to be stuffed, put their eyes in and sewn together.

It took me 5 tries to figure out the pattern this time. You can see the practice ones in the front. The first one is on the left and then progressively to the right. You can see that I tried a completely different pattern for the last one. The funny thing is that I ended up liking the first one the best with just a tiny tweak.

Here they are, ready to be shipped to their new homes!

Monday, November 24, 2008

Thanksgiving sale and mittens

Oh, I have to share these mittens that I just found a pattern for! But first, let me mention that I will be having a thanksgiving sale at my etsy store from Friday 28th to Monday 1st. All items 20% off before shipping. In payments section select payment method Other, and in message to seller add coupon code "Barefoot". For other Black Friday sales on etsy, visit: http://www.blackfridayonetsy.webs.com/

(above- the mouse print I mentioned in my last entry)

I have been busy in the craft room lately too. I've made some new stuffed animals, now being posted in my shop. A friend came over last Sunday to make an apron (we had a craftdate), so I decided to make one for me too. I came up with a cute little design that ended up working out pretty well. It reminds me of play dresses for little girls, so when I wear it, I feel like giggling a lot. ;) Maybe I'll might make a couple of these for sale in the etsy store as well after new years. I also was inspired and started working on that Simplicity tunic, that I cut the pattern out for several weeks ago. I am always confused with the sizing info, but I made a size 12. The bust and waist fits ok, but it's too tight around the butt, so I have to go, and loosen it in the seams. I'm about half way done, the arms, neckline, heming and zipper still need to be sewed. I am leaving the key-hole out from the front.


Ok, so now to the mittens. After the last craft fair, I have been knitting a lot, hats and scarves mostly. I have a couple of designs I wanted to do. One for my mother in law (if I ever finish it- well, I guess I should start first...) and a pair of mittens for me. The blue ones on the left are a cowl and hat pair I made, they are such a luscious soft blue yarn! So cute, makes it look like there are little ears. (chuckle)

The yarns in the picture below are some that I got from Michael's last week. The brownish gray is for the shawl, and the colorful ones I was going to use for little projects- now for the mittens. I'm thinking the orange and green for them? The pattern is from Hello Yarn Handspun Yarns. She has so many cute patterns for mittens, hats, bags etc. I have to make the bug ones for my husband at some point. Oh, if there was only enough time...


The shawl pattern that I was going to make for the MIL, is from Knitty. It is so versatile! I can't wait to start on it, but since it is a longer project, I think I'll make the mittens first. If it's super sute, I might have to make one for myself as well...


Friday, November 14, 2008

Favorite fabrics, new idea for Butler bag

Ooh my goodness, it has been so busy after the bazaar. I got several comissions for things, mostly knit items, that took me a week to do. I made some really cute winter messenger hats and a scarf, and made another Amy Butler bag. I came up with a new way to sew the zipper on it, so I thought I would share to all those who are working on one.

After cutting everything out, adhering interfacing and ironing, the zipper is one of the first things I sew. With this technique the bag ended up being a little skinnier than the previos ones, so if you want it to be wider, make the top part of the outer fabric wider.

- sew the outer fabric down the middle like you are supposed to according to the pattern, I sewed a larger seam than the pattern asks for. (see picture, on left)

-sew the lining to the underside flaps of the outer fabric. Press the seams flat. You can see on the right side that the lining ends up being really wide this way, I just cut it so both layers are same width.

-next place zipper on the back side of the flap facing down, pin in place and sew all the way around. Voila!

-now to attach the two short pieces at either end, I made kind of an X-seam, so that both the front and lining fabrics can be attached. Sew all the 4 edges separately, and then the small distance in the middle, I sew that flat through all the layers. (See pictures, the middle has not been sewed yet, there is still a hole)

-after this, I attach the handles and pockets to the side panels.

-I sew the side panels on first and then get to the outside side panels. Now this might be obvious, but when you sew the panels together, I find it easier to sew it with the panel side up, rather than sewing on the zipper flap side. (see picture, on the side that is pinned)
-also something else that worked out, was attaching the lining and outer layer together before I turned it inside out. I just sewed the two layers together at the top. (see picture)


There are also two portfolios that I will be in so I finished two prints for those. One of them was a little ant print, that I got the inspiration for from Proverbs 6:6

Go to the ant you sluggard,
consider it's ways and be wise.
It has no commander, no overseer or ruler,
yet it stores its provisions at summer
and gathers its food at harvest.
I had a good time carving, since I have not made a linocut in a while. The other linocut I made for the other portfolio was a little mousy. I should get a photo of that as well...

I've been browsign fabrics as well and wanted to post some of my favorite picks. They are from various sites, but I put the names down so you can look them up if you want.

Monday, August 4, 2008

New Livingroom

Whew, I just got back from a 2 1/2 week vacation from visiting family in Finland (my parents farm on the left). I had a great time! For the first week we took some time to fix up our summer house. We put up new wallpaper and paneling, and new laminate floors over the old yellow wood floors. I wanted to paint them, but my mother insisted with the laminate... Go figure. I hope that next summer I can paint the yellow wood floors in the foyer gray. Talking about painted wood floors, I came upon two cute things on the web today. one of them is this cute floor decal, called Tango. What a whimsical way to brighten up a room. I think I could also paint something similar. The white painted floors in the other picture look so lovely and crisp. I would love to get this feel at our summer house as well. The rest of Yvestown's photo's are worth taking a look as well. Back to the summer house- after new walls and floors were put in we shopped around for some fabric for drapes and sofa cushins to liven up the space. We got a steal with this happy yellow-red-green stripe fabrick being 70% off! Sewing drapes and pillows was a nice little vacation project. We hung up some white shelves from ikea (you can barely see it on the bottom right picture, but they are there). My mother put up some of the antique items on the shelves and we hung up some old pictures to give some character. I think it all turned out very nice, bright and summery. A nice change from the dingy old place.

Thursday, July 10, 2008

Weekender Travel Bag


This week I finished my first try at the Weekender bag by Amy Butler. It seems that I have been in an Amy Butler mania last couple of months. I think I got it out of my system now. ;)

The weekender bag was a fun project. I decided to make it without the cording around the edges due to the fact that I sewed the zipper to the top and lining at the same time and sewing everything toggether was pretty bulky. I used a wool twill fabric remnant for the outside, with a little leaf motif from the leftover Butler fabric from the last tunic. It gave the boring fabric a spark!


Some other modifications I did was make the handles a little longer, about 55" and sew around them two times to secure them to the bag. (In the picture the handle has three rows of stitches since I first sewed just the handle by itself.) Instead of just sewing back and forth at the top, I made an "x", also in the picture.

Another modification was a pocket for a water bottle on one of the sides instead of a flat pocket. I figure on trips that will come in handy as well. The bag is really nice and roomy, and has the same pockets all around on the inside as well. I am looking forward to seeing how it travels. TIP: I think if I make the bag again, I would make the inside pockets 3" taller, so that they would come up closer to the top. I imagine the bag being filled with bulky items, and it would seem that the less tal pockets would get all jumbled up.


For the interlining I just used the thickest lining I got from Walmart, so it is not as stiff as maybe with Timtex like used in the pattern. The lining is a brown cotton fabric, the same as for the handles. I used some of the plastic craft mesh used for needlepoint for the bottom and it worked out fine. I stitched it together 2 ply before inserting. I also sewed in between the outside and lining so that you can't see it. The bag is not as neat as in some other pictures I've seen, but it works for me. I can't wait to use it!

Saturday, June 21, 2008

Giraffn' Around

Today a bunch of giraffes were born. I was trying to use up the last bit of yellow courdroy that I had lying around, and ended up cutting 7 of the little buggars out of it. Like with the critters yesterday, I wanted to keep some to put up in my shop and give some to my friends store, which I think I'll go visit next weekend. Here's some pics of the little guys, left: seven skins, middle: three done, right: done!

Finnfactor Design

Finnfactor Design