Showing posts with label Amy Butler. Show all posts

Friday, November 14, 2008

Favorite fabrics, new idea for Butler bag

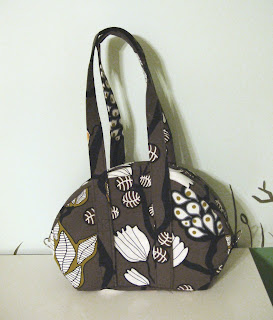
Ooh my goodness, it has been so busy after the bazaar. I got several comissions for things, mostly knit items, that took me a week to do. I made some really cute winter messenger hats and a scarf, and made another Amy Butler bag. I came up with a new way to sew the zipper on it, so I thought I would share to all those who are working on one.

After cutting everything out, adhering interfacing and ironing, the zipper is one of the first things I sew. With this technique the bag ended up being a little skinnier than the previos ones, so if you want it to be wider, make the top part of the outer fabric wider.

- sew the outer fabric down the middle like you are supposed to according to the pattern, I sewed a larger seam than the pattern asks for. (see picture, on left)

-sew the lining to the underside flaps of the outer fabric. Press the seams flat. You can see on the right side that the lining ends up being really wide this way, I just cut it so both layers are same width.

-next place zipper on the back side of the flap facing down, pin in place and sew all the way around. Voila!

-now to attach the two short pieces at either end, I made kind of an X-seam, so that both the front and lining fabrics can be attached. Sew all the 4 edges separately, and then the small distance in the middle, I sew that flat through all the layers. (See pictures, the middle has not been sewed yet, there is still a hole)

-after this, I attach the handles and pockets to the side panels.

-I sew the side panels on first and then get to the outside side panels. Now this might be obvious, but when you sew the panels together, I find it easier to sew it with the panel side up, rather than sewing on the zipper flap side. (see picture, on the side that is pinned)
-also something else that worked out, was attaching the lining and outer layer together before I turned it inside out. I just sewed the two layers together at the top. (see picture)


There are also two portfolios that I will be in so I finished two prints for those. One of them was a little ant print, that I got the inspiration for from Proverbs 6:6

Go to the ant you sluggard,
consider it's ways and be wise.
It has no commander, no overseer or ruler,
yet it stores its provisions at summer
and gathers its food at harvest.
I had a good time carving, since I have not made a linocut in a while. The other linocut I made for the other portfolio was a little mousy. I should get a photo of that as well...

I've been browsign fabrics as well and wanted to post some of my favorite picks. They are from various sites, but I put the names down so you can look them up if you want.

Monday, September 8, 2008

Jewelry stand/nic nac holder

I am going to be attending an indie craft fair at the Desotorow Gallery in Savannah this weekend. Getting ready for the fair, I made a folding stand to hold jewelry and note cards on. I figured while I was at it, I would document the process, so someone else might take advantage of the idea as well. I used some left over Amy Butler fabric for it. Check out the instructable here. Since I just made it, I dont have the best pictures of it yet, but I'll be sure to add some next week after the fair. You could take the idea and run with it, either just make one panel and hang it on the wall, or make three, four or five panes and make a folding screen type of display.

Thursday, July 10, 2008

Weekender Travel Bag


This week I finished my first try at the Weekender bag by Amy Butler. It seems that I have been in an Amy Butler mania last couple of months. I think I got it out of my system now. ;)

The weekender bag was a fun project. I decided to make it without the cording around the edges due to the fact that I sewed the zipper to the top and lining at the same time and sewing everything toggether was pretty bulky. I used a wool twill fabric remnant for the outside, with a little leaf motif from the leftover Butler fabric from the last tunic. It gave the boring fabric a spark!


Some other modifications I did was make the handles a little longer, about 55" and sew around them two times to secure them to the bag. (In the picture the handle has three rows of stitches since I first sewed just the handle by itself.) Instead of just sewing back and forth at the top, I made an "x", also in the picture.

Another modification was a pocket for a water bottle on one of the sides instead of a flat pocket. I figure on trips that will come in handy as well. The bag is really nice and roomy, and has the same pockets all around on the inside as well. I am looking forward to seeing how it travels. TIP: I think if I make the bag again, I would make the inside pockets 3" taller, so that they would come up closer to the top. I imagine the bag being filled with bulky items, and it would seem that the less tal pockets would get all jumbled up.


For the interlining I just used the thickest lining I got from Walmart, so it is not as stiff as maybe with Timtex like used in the pattern. The lining is a brown cotton fabric, the same as for the handles. I used some of the plastic craft mesh used for needlepoint for the bottom and it worked out fine. I stitched it together 2 ply before inserting. I also sewed in between the outside and lining so that you can't see it. The bag is not as neat as in some other pictures I've seen, but it works for me. I can't wait to use it!

Friday, June 13, 2008

Sewing day

I had the day off from work, so I decided to dedicate it to sewing. Here's what I made.
The elephants on the left side are still waiting for eyes and ears. Here we go...

I also sewed another tunic altered from the A. Butler Anna pattern, but this one is a little more fitted and has a lace to tie around the waist. I used this awesome vintage cotton printed fabric for it. The fabric used to be curtains before. I just love the fabric! The leftovers made for some plush animals for the store. I also received the weekender bag, and Lotus patterns from A Butler today!!! I can't wait to try them out. Maybe next week...

Wednesday, June 11, 2008

Sophia carry all w/ modifications

I got really excited about the tunic, and decided to also make the Sophia carry-all bag by Amy Butler. I had the pattern already, and had made a bag from it a while ago (which turned out great as well). The first time around I did not like the way the lining had to be hand stitched to the outside. The handle was a little too short for me too. For future use, I also decided to sew two rings at either end, in case I ever want to add a long strap to the bag. I set out to make these changes.

The way I stitched the zipper in was the same way as the directions tell you to, but I added the lining layer to the stitching as well. You can see it in the picture, basically stitching all the way around the zipper locking it in between the top and lining. Then just open the basted stitches and voila! You're done. The rest of the bag is stitched essentially the same. I sewed the lining together first, leaving one of the long sides open to turn the bag inside out effortlessly. It will be a lot more easier to sew this shut than trying to sew the lining by the zipper. I guess the sewing can be a little bulky at times, but it wasn't that bad.
In the photo above, you can see a detail from the lining panels. I stitched the edge of the pocket and side panel together to make it easier to stitch to the top.


Here is the bag turned right way out. I was going to slip the rigid bottom in between here before sewing it closed. Below are pictures of the finished bag.

Monday, June 9, 2008

Anna Tunic from Amy Butler pattern

I made the first version of the Amy Butler Anna tunic a couple of months ago, and wanted to make some changes to the pattern. I finished the second version last night, and like it much better now. Here is view from back without belt:

Picture from front without belt.
Picture from side with belt.
Picture from front with belt. I'm not a girly girl, so I did not make the flower for the top.

I left the lining out, and just made it out of a single layer of fabric. So to compensate for the under the arms seam, I just used bias tape.

Instead of 4 buttons i just used 2 at the top.

The shoulders were too wide for me on the first version, so I squared off the sides a bit.

So here is the final version. I really like it now, and hope to make another one out of some other fabric. The fabric I used for this one was recycled from a retro duvet cover... Its bright yellow with flowers.
I hope you enjoy the images. I hope to post lots more from future projects. Other things in the works are a knit shawl and a quilt and of course more thngs for my etsy store.

I also just purchased the weekender bag and lotus tunic patterns from A. Butler. Can't wait to receive them!!!

Finnfactor Design

Finnfactor Design