Monday, November 3, 2014

Toothless Dragon Costume Mini Tutorial

Since we have been on a dragon theme, lets do at least one more post related to Toothless the dragon. When searching for cake ideas for my daughters party, several images of toothless hoodies and costumes popped up too. I thought it would be a fun thing to make her a little play toothless outfit too, and since halloween was right around the corner, I could kill two birds with one stone. 

The Pinterest board of Dragon birthday party ideas has the inspiration I used for the outfit. Here are a couple of the hoodies that I looked at:


I was on a time limit as usual, so instead of creating all the bells and whistles for an outfit for a 3-yr old who has the attention span of a goldfish, I wanted to take the most important things and pare them down to the basics. I took some pics along as I went of materials and will try to explain a little what I did to achieve the final product. 

*I will have to say that I totally winged this project as I went along, so I don't have any measurements or a pattern to share.* 

To start the project, I got a black fleece hoodie and pants from WalMart for about $14 total. I wanted to make a piece that would sit on top of the hood and act as the head of the dragon. I started with some scrap paper and through trial and error got to the shape that the head piece should be. It basically is one large piece with two sickle shaped slits on the sides to form the sides of the face. 
For the inside, I cut out a piece that was just the top 1/4 of the head and sewed it on to form the flaps. To make the head more rigid, I used spacer mesh I had at home to first glue two layers in the big flaps before turning inside out. The ends of the mesh ran out an inch or so that they would help the flaps stay up. 


Then I cut a piece of fleece that would cover the rest of the head and a piece of spacer mesh that i sewed into shape individually. Next, I sewed the fleece on the head and cut pieces of fusible webbing to fit both the top and bottom of the mesh, to basically glue the mesh to the fleece both top and bottom. Ironing was a little tricky, and a nail biter. I wasn't sure if the iron was going to melt the mesh on the inside, but everything got glued up and nothing melted. Below is a shot of the mesh sewed up.


Here is the head without the eyes after fusing. I like the soft roundedness that the mesh gave it. For the eyes, I used craft felt in yellow and black and cut two eye shapes out of it. I first glued them on, but realized that kids will rip them off, so had to go back and sew them on properly. When the head was done, I just hand stitched it on the hood of the shirt. 


Next up Wings:
Started with two coat hangers. One I opened and bent into the large horn shape. The other I made smaller and made the small shape on the bottom to use as a stabilizer so the wings wont flop upside down. I covered it with a strip of felt and then duck taped it around and around. Now it looked like a longhorn head. 


Then I laid the shape on the fleece and cut out a piece that looked like wings. Then cut out a piece of black jersey for the reverse side of the wings. I pinned it all together and inserted black elastic on the top for the arm loops and sewed around, leaving a large hole on the bottom. 
Then, clip and trim seams, turn inside out and insert the clothes hanger inside the form. This was a little tricky, and I had to seam rip a little to get it to go in there. Then I sewed around all the edges, encasing the hanger in its own little pocket. This was pretty tricky too, since the hanger isn't super bendy and I have a wall a foot behind my sewing machine.   


Lastly for the wings, I sewed the arm loop elastics about half way down the wing as close as I could get to the middle stabilizer. I left them long, in case they didn't fit and I had to adjust later. 


For the tail, I took a piece of 3" thick batting and shaved it to a taper at the skinny end. I cut a long triangle out of fleece to fit around it and pieces of jersey for the flaps at the end of the tail. The jersey has pieces of thin craft foam in between to keep it together. Again, I used the fusible webbing to hold things in place before stitching around. Worked great and did not melt this kind of foam either. 
Then I sewed the fleece tail triangle together with the flaps rolled up at the end. The last two steps were to add black velcro to the hoodie and top of tail to attach them together and to sew a zig zag on a folded piece of fleece to make the ridges on the top of the tail. The ridge I just hand sewed on again.  
(I took some pics of the tail construction but realized that they are still in my phone. I'll update the post with the pics soon)

It was finally finished completely, on Halloween. She already wore the hoodie to school a week before Halloween which was fun. Here are some pictures of the finished outfit in action: 


The wings are fun because you can bend them in and out as you need to.


When Tootless is too tired to fly, she just rides horses. 


Thursday, October 30, 2014

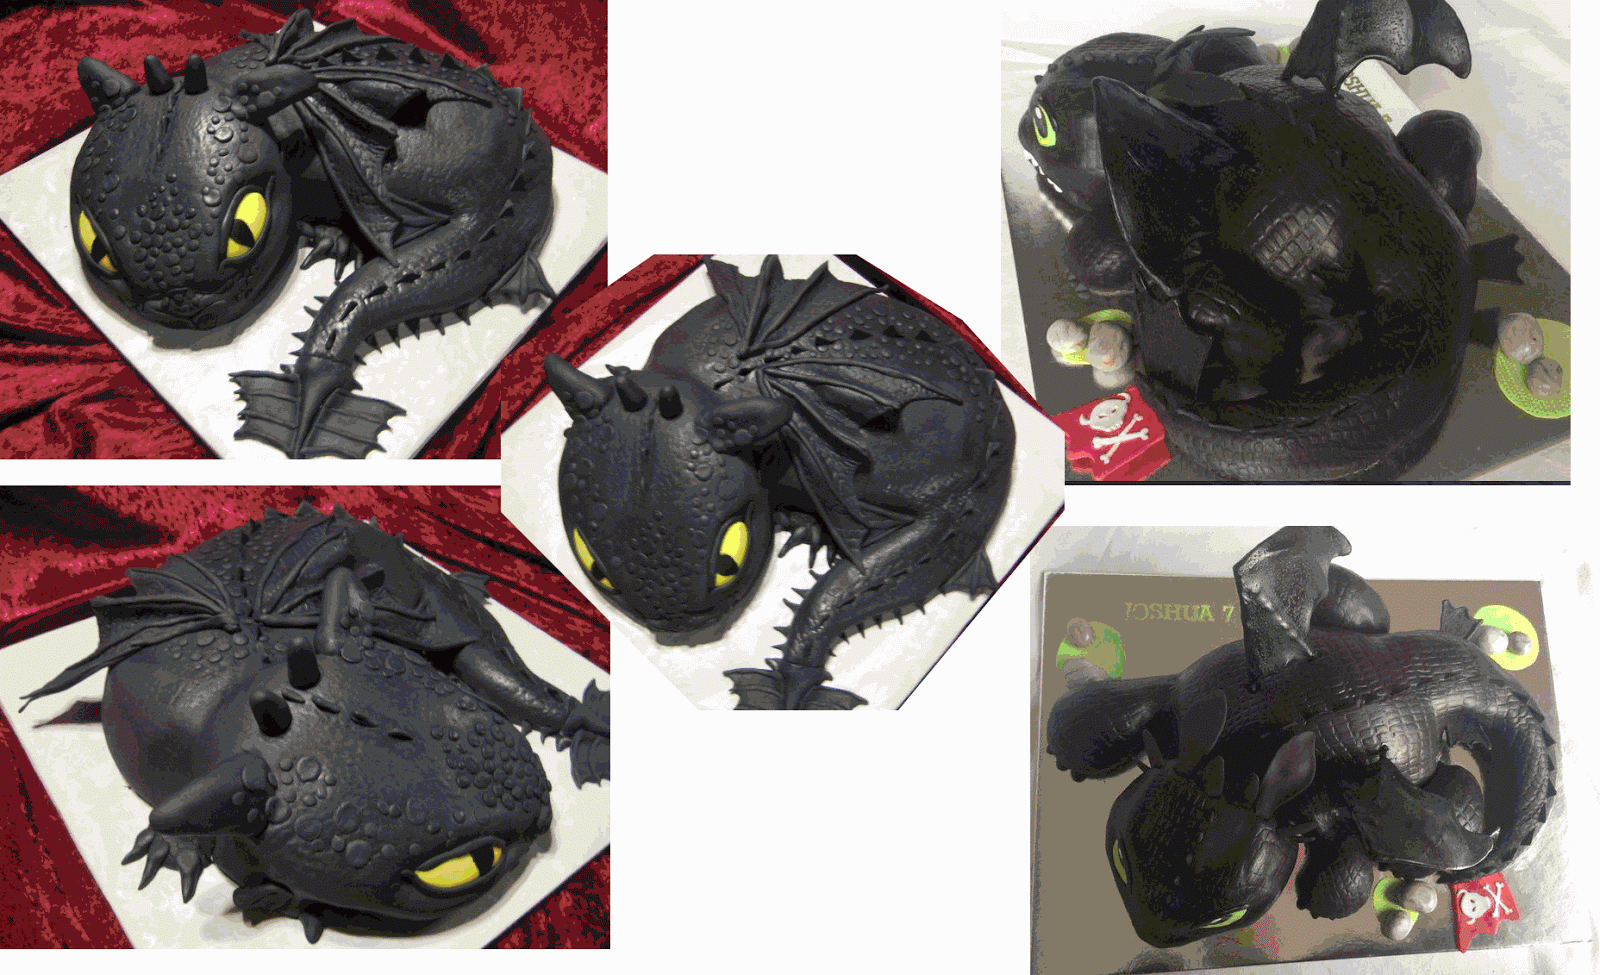
Toothless Dragon Cake

My daughter loves animals in general and we had talked for a long time about what her birthday cake would be. Her top runner was a horse shaped cake, but at the end she changed her mind and wanted a toothless dragon cake. A horse head would have been so much easier, but I was never one to shy away from a creative challenge. I immediately wanted to do a black dragon shaped cake, but wasn't sure if I could do things that I've only seen on the cake shows on tv...

Thankfully Pinterest came through again for inspiration. I started a board for a How To Train Your Dragon themed birthday party with lots of pictures of cakes and got two more ideas to make a toothless plush dragon for a gift and a toothless hoodie costume that would be for halloween.

Here are the cakes that I found closest to what I wanted to make for my daughter:


I decided to make the body from a white cake and the head from chocolate. Since I've never done this before, I pretty much winged it and this is photo story of how I did it. 

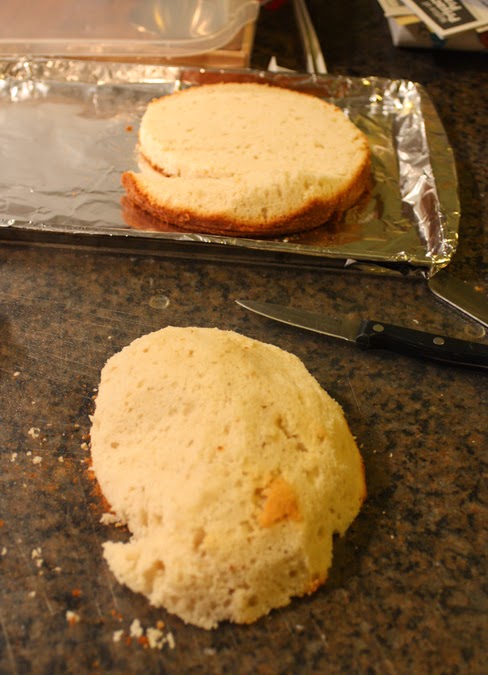
Body: I took the yellow cake and cut it with a knife into the basic shape of the body and tail. 


The filling was a combination of mashed banana and applesauce and whipped cream on the top. Before putting the filling on, I spooned a little bit of apple juice on the cake base to moisten it. 


Cake cut in half before the filling goes on. 


Filling going on. 


After the filling was on, I put the second layer on and cut another little piece off the top and filled it. Once the top layer was filled I did a coat of whipped cream on it to keep the crumbs from coming off. They always do it on the TV shows, so thought I should do it too. ;)


I have never done fondant before, so the next step was very interesting. I had some white fondant which I added black coloring to. Once it was dark enough, I rolled it out dusting with powdered sugar as I went to keep it from sticking. 


I got it on the rolling pin and stuck on the body tucking it in the best I could. From the leftovers I cut little triangles that I used for the spikes on the back and the fin on the tail. 


For the wings, I just kneaded and rolled out more of the leftovers and made shapes. I don't know how you are supposed to get this stuff to stick, so I wet the bottom a little and then uses pins to keep it in place until it set. It seemed to work out fine. 


Then for the Head: I cut up the chocolate cake and looked at it by the body. I had to go back and forth a couple times to get the shape and size right. From the cut out cake edges I took little mini pieces for the flaps at the back of the head. The head had one layer of filling on the inside and the crumb coat before the fondant could go on. 


Then another piece of fondant was rolled out and laid on the head. I used a pair of scissors to cut around the flaps and a butter knife to pat/tuck it around them. After the fondant was on, I realized I should have kept a bit for the eyes... How I solved that problem was to use cutout edges from the yellow cake, shave them very thin and use them as eyes. Not the brightest color, but the best I could do at 10pm day before the party, and they are completely edible and use no additional artificial colors! After shaving them thin, I cut out eye shapes from the fondant and tuck the cake pieces inside the eye holes. They stuck really well and actually looked cute I thought. Then I just added the candle and lettering for her name. (I had to use a cake pan covered in foil, since I didn't have anything else large enough. We were having a tiny party anyways, since we just moved and don't know anyone here yet.) 

So here are some pics of the finished cake. I'll try to post some pics of the dragon plush and costume tomorrow. I've also worked on so many other things but have a hard time remembering to take photos working a million miles an hour with whatever free time I have. There's also a pair of awesome linen pants I finished yesterday, so maybe that can be the next post. :) 


Saturday, September 27, 2014

Rope Shibori Rippling Water Tutorial

Hi everyone! I'm back with a new quick tutorial for shibori dyeing with a thick nylon rope. You can check out my previous posts for snowflake (Sekka) shibori instructions and inspiration.

This technique is very similar to the one with dyeing on a pole, but the results are a little different. I looked for ideas and inspiration online on how to complete this and pinned a whole bunch of them on my Pinterest dyeing board (image is a link there). I am by no means a dyeing expert, so please also do your own research before taking my word on dyeing fabric. I am more of a fly by the seat of my pants kind of a crafter, but thought it would be nice to share the process, however unscientific it was. ;)


To prepare for the process, I washed twice in hot water and then soaked in warm/hot soda ash solution (which ended up being a scouring solution a little bit too). The fabric was then set outside on the drying rack to dry. I had also visited the local home improvement store and bought a 4 yd piece of the thickest nylon rope they had.


After the kids went to bed, I was ready to start the dye process. I laid out the fabric and placed the rope lengthwise on one side. The rope was shorter than the fabric at both ends, but it didn't matter much since the fabric was going to be scrunched up. Next, roll the fabric loosely around the rope.


Above on the left you can see the loose roll. When rolled, start scrunching the fabric towards the middle of the rope. Work on scrunching it together as tight as you can. Some directions I've seen say tie the rope into a loop, but since my wrap was so long, I just made a knot at each end to keep it from unscrunching. I did not use any sort of string or rubber bands to keep it from unravelling. 


Next, put the rope in a plastic container and prepare your dye. I used the tie dye directions from Dharma's website to mix up my dye. To give you an idea, I ended up using about 4 cups of dye for this 5 yd wrap. The color was Dharma's Fiber Reactive Procion Dye in color Alpine Blue. The mixing was roughly 2tsp of dye per cup of water. Once the dye was mixed, I used a squirt bottle to cover it as evenly as I could. Rolling the fabric in the bin as I went along and going about 3 times over. 


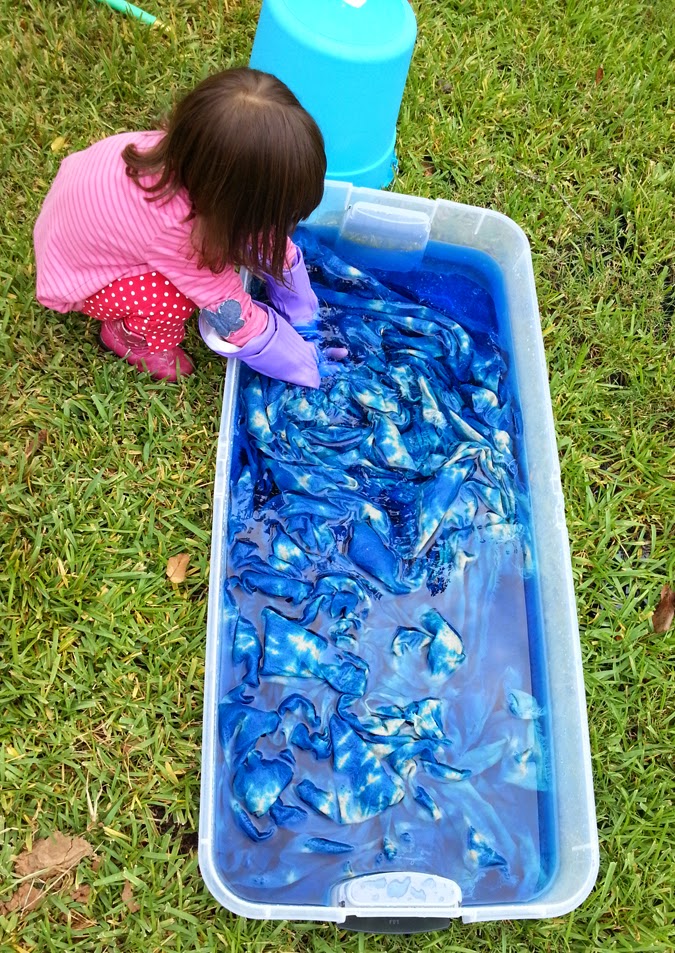
I let the rope sit covered in the garage overnight and we unscrunched it the next morning in the back yard. This is always the fun part! Pull the rope out and unravel the fun. Then it's time for rinse, rinse, rinsing until the water runs clear. My daughter was eager to help me at this stage. 


Here is the wrap laid out before rinsing. I love the water ripple effect that is happening there. 


Once the water ran clear, I dried it outside in the sun and then cut and hemmed it. I probably should have waited until after washing, but hated the unravelling edges, so decided to hem in between. So after hemming, I tossed the wrap in a hot wash. Here are some shots of it all done. I decided to cut off the edge that was lighter and leave more of the solid edge for the wrap. I figured it would be less busy that way. Here are some shots from tonight before my model went to bed. 


I really like the way this turned out. It has a pretty shimmery effect and really looks like sun shining through water. I started thinking if it would be possible to do it again, but with autumn colors to make it look like sun shining through tree branches in the fall...
My final thoughts: Next time use a little less dye, maybe around 3 cups for the same length of wrap to get more of the ripple pattern to come out. All in all, very happy with this and will try again.

Thanks for coming and check out the blog for more fun tutorials. Next time I'll share some pictures of the making of our How to Train Your Dragon Toothless birthday cake.

Sunday, August 24, 2014

A House. Finally.

We have been a wandering family since May 3rd, but finally tomorrow we get to start moving into a new house in TX! As you can understand it's something to celebrate. Can't wait to have a sense of normalcy in our lives again. The house we got is pretty dark in color scheme, so I spent wednesday painting two rooms and have one more to go on monday before our belongings get moved in on Wednesday.
This is my new studio that will house both sewing and printmaking equipment. It'll be interesting to see how I can keep them both on their own sides of the room. The good thing is that the room is at the opposite side of the house than the bedrooms, so I can even finish up projects at night without waking the kids. In our last house my sewing and printmaking was in the next room over. So nothing could happen at night.

Here is the room before. It was a deep red color, that made the room dark. It needed to be changed to something more cheerful, since red also makes me feel anxious.


I wasn't very prepared when going to Home Depot to pick colors, but after some minutes trying to figure out what I liked, this is the color I came home with. I should have gotten something a little warmer, since the tiles are yellow/brown. But its too late now. Anyways, its a pretty colors, and once all my equipment is in, you won't notice the tile any more.


The lady at the paint section recommended a Glidden two in one paint, which enabled me to cover all that red in one swell coat. Saved me a ton of time! You could see some little pit marks after the paint had dried, so I went over a thin second quick coat to cover those up. 

The other two bedrooms are dark brown, even the ceilings, so something had to be done about those too. I don't think a cave is a fun play place for little kids. There was almost a gallon left over from this, and since there was some time left that day, I painted one of the bedrooms with this color too. Yesterday I went to Home Depot and got one more gallon of a light yellow color, that will go up in the other little bedroom tomorrow.  

On a crafty note, this is also sitting on my sewing table. Ready to be chopped into a ring sling and a shorty. Good times! I can't wait to get my proper sewing room set up. There are so many awesome things ready to be put together. Can't wait to share them with you. 


Thursday, August 14, 2014

Green Shibori Ring Sling


I love the way my first trial in Sekka Shibori turned out and wanted to post just a short story of the second one I made the following day. I had a 2.5 yd piece of Osnaburg cotton that was the perfect candidate to retry folding and dyeing. This time instead of the hexagon pattern I thought it would be fun to fold it slightly differently to get a square/diamond pattern. To get the hexagons, you fold the fabric in a triangle that has three equal sides and to get the squares, you fold the fabric so that there is a 90degree angle and two short sides and one long. See my image below. For the start of the folding you can see my first shibori tutorial here 


Below is the first fabric I dyed in the hex pattern that was made into a wrap. 


To start with this one I did an accordion fold just like with the previous fabric, which I then folded into triangles like in my illustration above. After soaking it in soda ash for 45 min or so, I took the same pieces of wood from the first dye job and clamped them around this fabric. They were not the same size as this stack obviously, but I figured that would work in my advantage letting more dye penetrate my folds.  


The first time around I would have wanted a little more dye to seep through, so this time the wood pieces were smaller than my fabric so I could squeeze and massage the dye more heavy handedly into the folds as I was painting it on with a paintbrush. When you do this just be sure to keep an eye on the clamp so that it does not pop off your folded fabric as you manipulate your folds. Below is the painted stack. I used Dylon Tropical and Dark Green shades to get a kind of a halo effect which I thought would look nice on the raw Osnaburg.  


The stack was then bagged for 24hrs and opened the next day. Below is an image of the stack unclamped and being unraveled. It is always like Christmas at this point! I rinsed the fabric several times and washed in hot to get the rest of the dye out. The greens came out more fadd than I had imagined, but I still liked the pattern and thought it just needed a little sprucing up. I thought the natural color of the osna was too brown, so into a yellow bath it went. After this round of dyeing, rinsing and washing the fabric was finally done. 


I hemmed and converted it into a ring sling with silver rings. I like the colors now much better. It reminds me of a retro kitchen tile pattern or something similar, which I anticipated and like. It looks cute when wrapped. :)  


Finnfactor Design

Finnfactor Design