I had a chance to drive to Brunswick, GA today to drop off some critters and art at my friend Melissa's shopette. If you live close to this area, the Antiques store can be found at 1601 Newcastle, in Old Brunswick. (There was a fantastic sandwich shop on the next block called Manhattan Subs, I would recommend that as well.)
Melissa, has a little room of her own in an antique store that is absolutely adorable. It was hard to take pictures in there, but I did my best. I built a stepped shelving unit to go on the floor to display little critters I had made. Here are a couple of photos of what is in her shop. We kind of turned the store upside down while setting everything up, but you can get an idea of how it looks from the pictures.
Out dogs are also the funniest things, I love watching them sleep in the most weird positions on the livingroom floor. Every once in a while I have the camera by me and I get to snap cute pictures of them.
Another fabric designer whose designs I fell in love with is Robert Kaufman. Here are a couple of prints from his collection. So cute, so cute...
Saturday, June 28, 2008
Saturday, June 21, 2008
Giraffn' Around
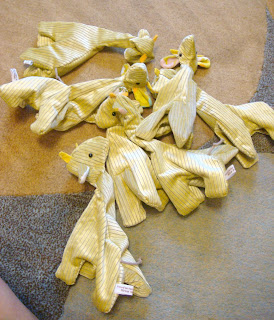
Today a bunch of giraffes were born. I was trying to use up the last bit of yellow courdroy that I had lying around, and ended up cutting 7 of the little buggars out of it. Like with the critters yesterday, I wanted to keep some to put up in my shop and give some to my friends store, which I think I'll go visit next weekend. Here's some pics of the little guys, left: seven skins, middle: three done, right: done!
Friday, June 20, 2008
New critters!
Today was a combined art day and craft day. I had some time to do prints, that are still undone, and on top of that I put together a whole bunch of little doggies and one kitty. I love these critters, they all end up having such a personality of their own. I posted one on etsy for now. Three are reserved for a friend to put in her shop next month. I am so proud of her, she has her own store front about an hour from our house, and is selling antiques with art, and more modern things. I am dying to go visit her new boutique. I'll post some pictures when I go down there.
Also in the works are a new design for a plushie for Jessica at the Shiny Squirrel Boutique, but not sure what that will be yet. I have ideas for an owl and a ferrett. I guess it will be a mystery until it is unveiled...
Labels:
craft,
dog,
etsy,
plush,
sewing,
shiny squirrel,
stuffed animals,
toy
Wednesday, June 18, 2008
What on earth is Etsy?
I realized today, that I mentioned Etsy in previous posts, but didn't really explain it to someone who has never heard of it. In case you haven't it is a website that you should definitely check out! Etsy is an online networking and marketplace for all things handmade. It's a place to find clothing, toys, gifts, jewelry and pretty much anything that you could think of and more.
The site is populated with little shops that you can browse through. Search by keyword, theme, or type of merchandise you are looking for. It is free to sign up as a buyer, same idea as with ebay. The great news for sellers of crafty items is that there are no expensive listing fees like with ebay, and your items lists for 4 months at a time.
There are thousands of amazingly talented artists and crafts people selling their handmade items, that it's almost too good to be true. For a price conscious cnsumer like me, I'm happy to say that many things are not over priced either, and most artists are happy to make personalized items for you as well.
If you haven't already checked it out, hurry up! http://www.etsy.com/
Here are some of my favorites:
Beautiful ceramic animals: http://www.mnsceramics.etsy.com/
Stationery: http://www.boygirlparty.etsy.com/
Jewelry/ felting: http://www.motleymutton.etsy.com/
To see all my favorites visit here.
Friday, June 13, 2008
Fitting clothes- HELP!
Making clothes for yourself can be a little chanllenging at times. Especially when you want to make alterations and cant fit and pin at the same time. I am so happy I ran into the online article in Threads Magazine that offers an effective solution on a budget for the problem. There is a duct tape version and one that uses paper tape. I think I will solicit help from the hubby and try the duct tape one, since I am assuming I could probably take that with easily, when we move next year.
Sewing day
I had the day off from work, so I decided to dedicate it to sewing. Here's what I made.
The elephants on the left side are still waiting for eyes and ears. Here we go...I also sewed another tunic altered from the A. Butler Anna pattern, but this one is a little more fitted and has a lace to tie around the waist. I used this awesome vintage cotton printed fabric for it. The fabric used to be curtains before. I just love the fabric! The leftovers made for some plush animals for the store. I also received the weekender bag, and Lotus patterns from A Butler today!!! I can't wait to try them out. Maybe next week...
Labels:
Amy Butler,
clothes,
elephant,
sewing,
stuffed animals,
tunic
Wednesday, June 11, 2008
If you like Amy Butler...
You might like Joel Dewberry and his fabric designs as well.
Chestnut breanches in aqua and
Pink Rose Damask swatches.
Sophia carry all w/ modifications
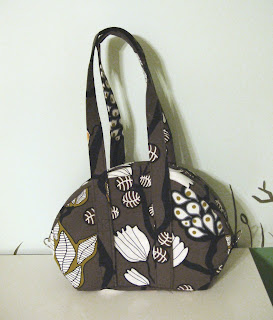
I got really excited about the tunic, and decided to also make the Sophia carry-all bag by Amy Butler. I had the pattern already, and had made a bag from it a while ago (which turned out great as well). The first time around I did not like the way the lining had to be hand stitched to the outside. The handle was a little too short for me too. For future use, I also decided to sew two rings at either end, in case I ever want to add a long strap to the bag. I set out to make these changes.
Here is the bag turned right way out. I was going to slip the rigid bottom in between here before sewing it closed. Below are pictures of the finished bag.
The way I stitched the zipper in was the same way as the directions tell you to, but I added the lining layer to the stitching as well. You can see it in the picture, basically stitching all the way around the zipper locking it in between the top and lining. Then just open the basted stitches and voila! You're done. The rest of the bag is stitched essentially the same. I sewed the lining together first, leaving one of the long sides open to turn the bag inside out effortlessly. It will be a lot more easier to sew this shut than trying to sew the lining by the zipper. I guess the sewing can be a little bulky at times, but it wasn't that bad.
In the photo above, you can see a detail from the lining panels. I stitched the edge of the pocket and side panel together to make it easier to stitch to the top. Here is the bag turned right way out. I was going to slip the rigid bottom in between here before sewing it closed. Below are pictures of the finished bag.
Monday, June 9, 2008
Anna Tunic from Amy Butler pattern
I made the first version of the Amy Butler Anna tunic a couple of months ago, and wanted to make some changes to the pattern. I finished the second version last night, and like it much better now. Here is view from back without belt:
Picture from front without belt.
Picture from side with belt.
Picture from front with belt. I'm not a girly girl, so I did not make the flower for the top.
Picture from front without belt.
Picture from side with belt.
Picture from front with belt. I'm not a girly girl, so I did not make the flower for the top.
I left the lining out, and just made it out of a single layer of fabric. So to compensate for the under the arms seam, I just used bias tape.
Instead of 4 buttons i just used 2 at the top.
The shoulders were too wide for me on the first version, so I squared off the sides a bit.
So here is the final version. I really like it now, and hope to make another one out of some other fabric. The fabric I used for this one was recycled from a retro duvet cover... Its bright yellow with flowers.
Sunday, June 8, 2008
Hi
HI, let me introduce myself: my name is Mirka. I decided to start this blog to share my crafts and interests to other people. I'm originally from Finland, hence the title for the blog.
I make art, sew, knit, crochet and build things. I have a store on etsy (http://www.mirkah.etsy.com/) and an artist website at http://www.mirkah.com/.
Check for updates for the blog soon.
I make art, sew, knit, crochet and build things. I have a store on etsy (http://www.mirkah.etsy.com/) and an artist website at http://www.mirkah.com/.
Check for updates for the blog soon.
Subscribe to:
Posts (Atom)